Branching Out

I’ve been traveling a lot for work lately, which has my head spinning a bit. So today I’m just going to share one little tidbit of styling know-how that came in handy on set in L.A. last week. It’s a little thing that can have a big impact on a space, both in-person and in a photo.

Working alongside the interior designer Jake Arnold, who created the space we were shooting, I spent last Wednesday morning adding decorative touches to a certain celeb's outdoor spaces to get them photo ready. Our goal was to make it feel finished and stylishly "lived-in.” 

Table stakes.


Table stakes.

After dressing the flat surface of the dining table with a host of trays, pitchers, and other tabletop items, Jake and I stood back and assessed the space. We both agreed it needed a fresh arrangement of flowers or greens to wake up the scene, and blurted out the same conclusion at the same time: ”What this needs is something branchy.”

Our choice: An oversized bunch of eucalyptus branches.


Our choice: An oversized bunch of eucalyptus branches.

Big, branching arrangements, you see, have a way of transforming a space--they add texture and function as a dynamic focal point. They eye lands immediately on the center of the arrangement, then up and out into the rest of the room. They can bring organic softness to a room full of harsh, modern lines; freshness to an industrial or masculine space; or playfulness to a serious setup.  Depending on whether you choose something leafy, like eucalyptus, or floral, like yellow forsythia or pink cherry blossoms, you can bring a calming, invigorating feel to the room or infuse it with a healthy pop of color.

Below is another scene that begged for branches. For this little vignette, I literally scrambled up the (celebrity) homeowner’s freshly mulched hillside and twisted these branches off a tree. As I jumped to grab them, Jake was at the ready with a pair of shears. Not my most glamorous moment… But look how pretty and poetic they look on set!

Click through to my Instagram feed to see these babies in ACTION.


Click through to my Instagram feed to see these babies in ACTION.

Not convinced of the magic in the big and branchy? Here’s a handful of amazing interior shots I’ve bookmarked recently that show the room-boosting power of a good branch. Try to visualize each image without the arrangement--many of the photos just wouldn't be as interesting without the leaves, twigs, and buds.

Credit: Suzy Hoodless via My Domaine


Credit: Suzy Hoodless via My Domaine

Credit: Daleet Spector via HouseBeautiful


Credit: Daleet Spector via HouseBeautiful

The abode of Frank Muytjens of J. Crew. Credit: Elle Decor via 12 Chairs


The abode of Frank Muytjens of J. Crew. Credit: Elle Decor via 12 Chairs

Source: H&M Home


Source: H&M Home

Funny enough, I was looking at the following shots of Jenna Lyons' much-photographed Brooklyn home, and hey hey! The stylist used the exact same vase of branches in two different shots. It does wonders for both. 

Source: Domino


Source: Domino

Source: Sotheby's via Apartment Therapy


Source: Sotheby's via Apartment Therapy

What kinds of branches work? Pretty much anything over 2 feet long, honestly. You can go to a flower shop or floral market and pick up eucalyptus, olive branches, or fruit-tree blossoms like cherry, quince, or almond. If it's late winter, you can even clip the bud-less branches off these flowering fruit trees and force them to bloom early by sticking them in warm water and bringing them indoors. Or you can do what prop stylists often do: Tromp around in the weeds and cut down something with a nice arch and leaf. Just be sure it's not poisonous. Because that'll bring a whole other dimension to the space. 

Love leafy, branchy arrangements? What type is your fave? 

Featured! My Homekeeping Tips on Glamour.com

As my husband will tell you, I have a pretty sensitive schnoz. If there's even a hint of mildew in a hotel bathtub, I'll smell it; if I'm on the bus next to someone who's left their laundry in the washer a few hours too long, I'll know. It's a curse. 

So when the folks at Glamour.com pinged me a few weeks ago asking me what household items I thought people don't clean often enough, of course I had a few things to say. My shortlist: Throw pillows, window treatments, and (my personal peeve) shower curtain liners.

Source: Glamour


Source: Glamour

Here's a blurb:

In a bathroom that's used daily by multiple people, fabric shower curtains should be washed monthly to keep mildew from forming, and the liner should we washed every week or two. Garlough shares her tips on washing those tricky liners: "To clean plastic liners, spray them down with a diluted vinegar solution, let it sit, and then rinse. Fabric liners should be machine-washed (with bleach if they're white, oxygen bleach if they're not) and dried in the dryer. If a mildew smell does develop, fabric liners can usually be salvaged with an extra-hot wash cycle; plastic ones should be replaced."

You can read the full story by clicking here. Of course, the guidelines and timelines I provided are skewed for a rented flat that several fashionable young Glamour readers share, and might not apply to everyone. If your guest room rarely gets used, or if your curtained shower stays dry while you take your daily soak in a deep tub (you lucky bastard), these  timelines can be stretched out.  

CLEAN YOUR SHOWERS, PEOPLE. THEY SMELL. 

With Love, 
Donna


How to Train Your Curtains

Unless you grew up in a FANCY house, were trained and certified as a decorating ninja, or read every page of every issue of Martha Stewart Living, there are some decorating secrets the average person never picks up. Like how to fold a fitted sheet, for example, or the life-changing sushi-roll technique for putting on a duvet. These are things that someone needs to let you in on.

As a former employee of the great Martha herself, I was lucky enough to learn the folded-sheet trick from a photo stylist on her team, and the sushi-roll secret was bestowed upon me by an episode of Meredith Vieira. (I was “sick” that day, I swear.) But it wasn’t until I was fussing with six fairly inexpensive curtain panels that just… wouldn’t… hang…. right…. that I discovered the mother of all decorating secrets.

Ahem.

Your curtains? They need to be trained.

As soon as I read this enlightened little fact, tucked away in a quiet corner of the World Wide Web, it was like someone had thrown back twelve layers of Belgian linen and dupioni silk and revealed the Great and Powerful Oz to me. PAY NO ATTENTION TO THE LIFE-HACKERS BEHIND THAT VERY USEFUL AND MONEY-SAVING ADVICE! shouted the curtain people from behind the blackout shades. CONTINUE PAYING $200 PER PANEL, OR YOU’LL NEVER BE HAPPY!

Indeed. (And by the way, I’ve never paid $200 for a curtain panel. Even if I’d wanted to.)

Here’s the secret, guys. While I won’t deny that really good fabric curtains, purchased in the right size for your window and hung at the proper height from great mounting hardware, can make a TON of difference in how your windows look, there’s another factor that separates ultra-nice drapes from the ones you buy in a two-pack at Bed Bath & Elsewhere. First, better-quality drapes  are engineered to hang properly; they’re backed with a layer of lining, and frequently have small lead weights embedded along the bottom hem. The added weight keeps the folds in check and the pleats from going all wonky.

But part of it happens after they’re hung, I learned. This article showed me that pleats don’t just appear; they first have to be arranged. This one took it a step further, suggesting that you bind the arranged folds of fabric for a few days to set the pleats. Once set, you can open and close your curtains and the fabric will automatically default to the “trained” folds. It's like reverse Botox: You tell the wrinkles exactly where you want them to appear.

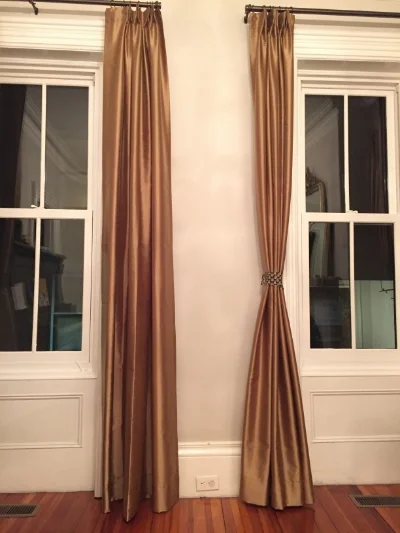
Want proof? Check out these faux-silk curtains right after I’d hung them. The fabric blew with every breeze; they flared out at the base in a sort of trapezoidal shape. It was time to start hacking.

The curtains before their training regimen. 


The curtains before their training regimen. 

Step 1: Adding pleats  

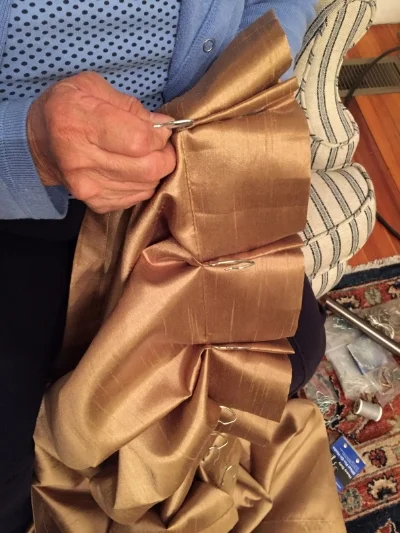
First I did what any resourceful home-decorator would do and waited for my mom to fly cross-country to visit. After letting her spend seven minutes with my children, I handed her my sewing bag and asked her to pinch-pleat the curtain tops. (“Six Dutch pleats per panel, Mom! You can see the kids when you finish them all.”) Pleating the tops was not a necessary step for great-looking curtains—hanging them from curtain clips would be just fine—but I’m an opportunist, so hey.

Thanks, ma.


Thanks, ma.

Step 2: The weigh-in

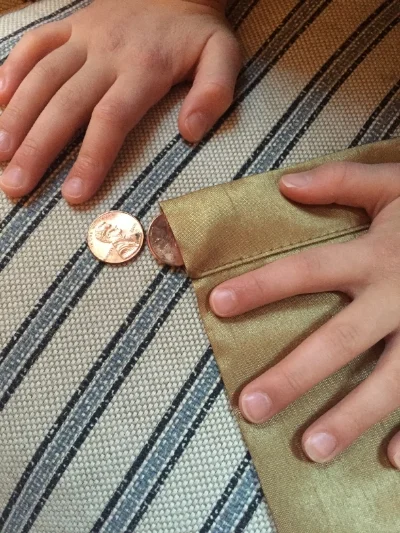
Next it was time to weight the curtains. This time I enlisted my 5-year-old daughter, whose hands you see here. While lead weights, either sewn into the bottom corners or all along the panel’s bottom edge, are the traditional method, I am 1) too lazy to go to the fabric store, 2) too impatient to wait for Amazon, 3) paranoid abour my children swallowing lead doodads, and 4) cheap. In lieu of drapery weights, I slipped six pennies into each corner of each panel. It worked like a charm and cost 12 cents per drape! 

Wee helping hands.


Wee helping hands.

If your curtains don’t have a slot like this, you can open the hem with a seam ripper, put our weights in, and follow the next step.

Step 3: Closing the gap  

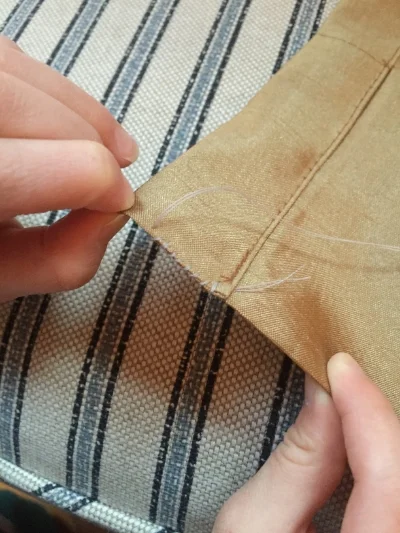
Once the “weights" were in, I tacked the curtain hem shut with a needle and thread. I used contrast-colored thread here so you could see my stitching. (Just kidding! I was too lazy to go to go out and buy gold thread, so gray it is!)

Tacked shut.


Tacked shut.

Step 4: Arranging the folds

My mom was nice enough to put the curtain hooks in for me, so next I hung the panels from the installed rods and hooks I began the training process. I pushed each panel as far to the side as I could, then ran my hands along the fabric to form six accordion-style pleats from top to bottom (one for each curtain hook, excluding the ones at the ends). I used a strip of scrap fabric to “belt” each panel into position, securing it with a safety pin.

Folded and bound.


Folded and bound.

Step 5: The training period

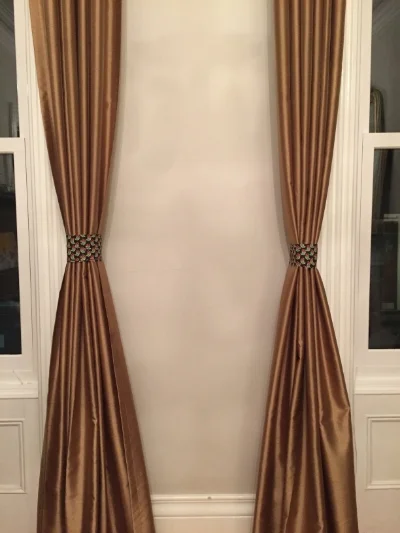
After three days in lockup, it was time to let the fabric loose. I removed the belt, smoothed the panels, and took this pic.  Check out how much more tailored the one on the left looks now. One nice straight line, top to bottom. Ahhh.

Trained curtains

Anyone have any other tips on making store-bought curtains look their best?


Obsessed With... Tasseled Touches

Sometimes an obsession is deeply rooted, inspired by an experience (like finding the perfect piece of African mudcloth at a flea market).  Other times it’s inspired by a specific need (like finding a replacement for a discontinued item). And then, sometimes, it’s just a picture--one image that you see and just say, that. I want that.

I think I found this shot while looking for pics of gray or black doors:

I bookmarked it immediately, thinking how nice a large tassel would look slung over each of my home’s brass doorknobs, or how cute a tiny tassel would be hung on one of the wee brass keys. (We have put working, old-fashioned mortise locks in every door we’ve replaced or refinished so far.)

I’m always looking for low-effort, high-impact ways to put a little pep in my home’s step, and this fits the bill, doesn't it? I just figured I’d pick up some curtain tiebacks next time I was shopping, shorten them as needed, and be good to go.

Then I saw this chest from Oomph. Oomph.

Source: Oomph


Source: Oomph

You can combine any finish with any tassel color, taking the look from traditional to glamorous to quirky. 

Of course the fascination spiraled from there. At this point I'm considering changing my name to Lt. DangleHere are some of my latest tasseled finds.

1. Easton Chest, $3,575, Oomph. 2. Laura Kirar for Arteriors tassel lamp, $636, Candelabra. 3. Gold leaf tassel-leg table, $160, Chairish. 4. Square cute tassel tieback, $36, Wayfair. 5. Metropolitan by Minka Vintage two-light sconce, $305, Wayfair.…


1. Easton Chest, $3,575, Oomph. 2. Laura Kirar for Arteriors tassel lamp, $636, Candelabra. 3. Gold leaf tassel-leg table, $160, Chairish. 4. Square cute tassel tieback, $36, Wayfair. 5. Metropolitan by Minka Vintage two-light sconce, $305, Wayfair. 6. Bungalow 5 Brigitte three-drawer chest, $1,224, Layla Grace