What to Do With Brown Kitchen Cabinets

Honest question: Has any home feature been vilified more than brown cabinetry in the last fifteen years? Seriously. Watch any episode of House Hunters or any home-renovation program on TV, and you’ll see young home buyers wrinkling their noses at kitchens featuring dark wood cabinets and grayish-brown granite countertops. “I want a white, bright kitchen,” they’ll say, sneering at the glossy finishes. On Pinterest and in shelter magazines, dream kitchens in white and pale gray tones dominate the scene.

Here's why I have brown on the brain: A friend living outside Boston recently reached out to me about her own brown kitchen. She and her husband are planning to rip out the countertops, flooring, lighting, and cabinet hardware, but they can’t decide what to do about the cabinetry itself. On paper, the cabinets are are everything they want—solidly built and configured relatively well for the space. The problem is their deep chestnut color:

The pre-renovation kitchen.

The pre-renovation kitchen.

While the “she” in the party would love to paint everything a pale shade, like all of the kitchen designs she’s pinned online, he’s hesitant to sand and paint over the wood grain, which stands as evidence of the cabinets’ handmade, hardwood construction.  

It got me thinking: Is it possible that brown kitchens have gotten a bad rap? Are there any drool-worthy brown kitchens out there? Forget the builder specials with Home Depot faucets and the cheesy, ornate, faux-Tuscan Real Housewives kitchens that dominated the early aughts. (You know what I’m talking about: this and this.) What does the brown kitchen of today look like, if there even is such a thing?

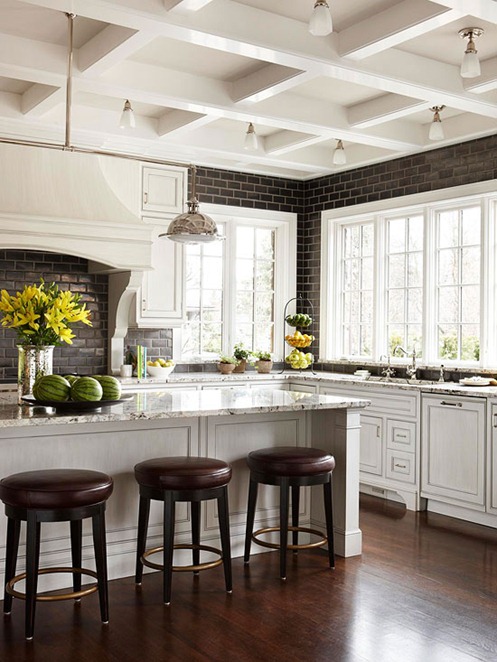
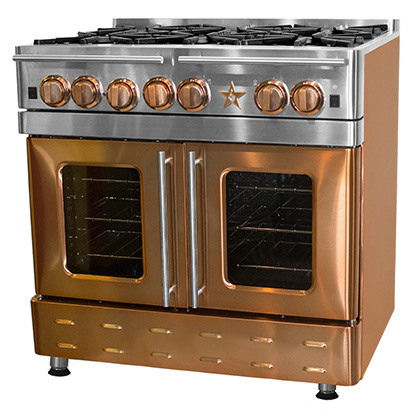
It took some digging, but i’m seriously digging these:

Source: Hometalk

Source: Hometalk

Credit: Lauren Liess via Country Living

Credit: Lauren Liess via Country Living

Incidentally, I recently shot my dear friend Jamie’s brown kitchen for my book; I loved how she brought campaign-furniture styling to her kitchen and modernized the look with brass hardware and brass-trimmed tile. It’s very glam, no?

Behind the scenes at our shoot.

Behind the scenes at our shoot.

So. What makes these good brown kitchens different from the ones everyone loves to hate? How do you make sure you end up with a fresh, updated look? A few tips:

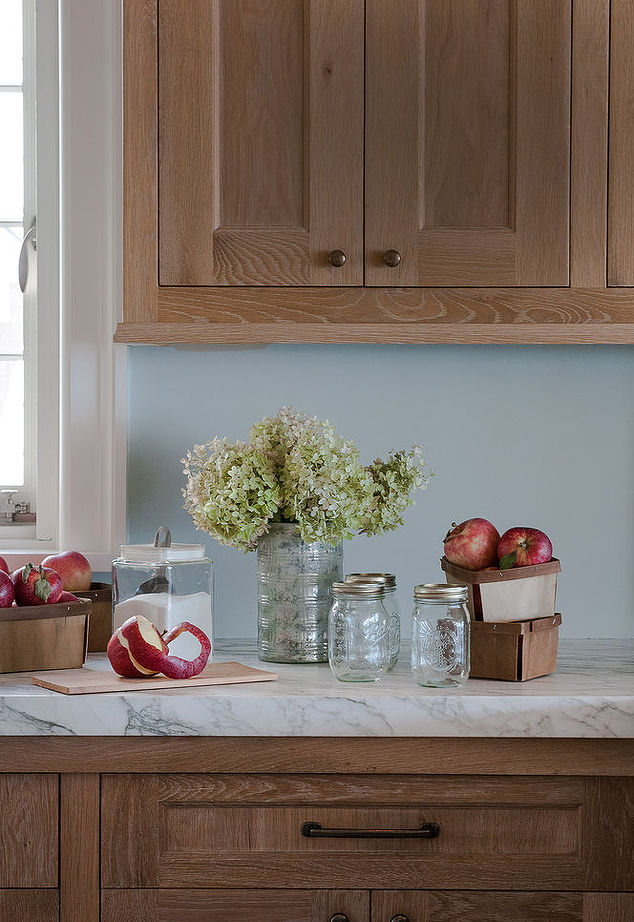
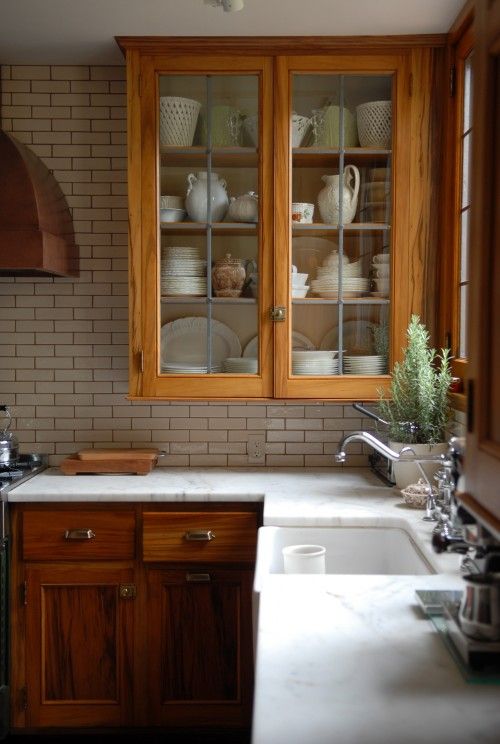
  • Mix light and dark. The dark woods in the above kitchens are paired with light subway tiles, pale walls, opalescent white glass light fixtures, and other elements that help brighten the space. 
     
  • Keep the hardware simple. Whether bar pulls, knobs, or bin pulls, the lines are streamlined and sort of utilitarian-looking, which gives them that understated, farmhouse vibe.
     
  • Elevate it with a smart mix of materials. In the “old” brown kitchen, all of the accents matched, typically in a dull finish of brushed stainless steel. The new version mixes stained and polished wood with metal, glass, marble, oiled bronze, polished chrome, and more. 
     
  • Choose walls and floor finishes that feel crisp and new. Whether it's powder-blue plaster or sleek tile floors, there's an element of modernity in all of these rooms.
     
  • Incorporate a hit of color. Be it in the paint, the accessories, or fresh greenery, there's something vibrant somewhere in the space.

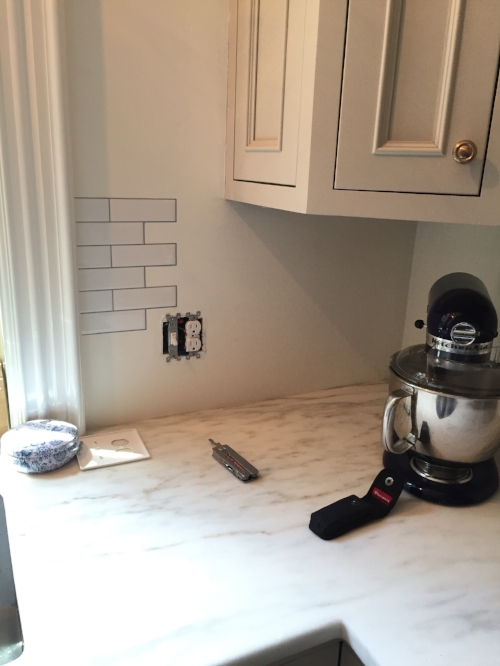
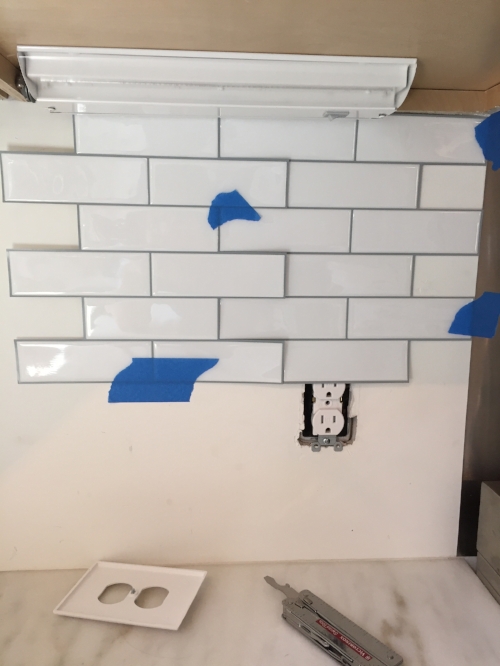
With all of this in mind, I threw together a mockup to show my friend how she might keep the existing cabinets and still get the fresh, modern-vintage farmhouse style she described wanting in her home. Have a look.

Corinn Ryan Kitchen.jpg

What do think? Are you anti-brown cabinetry, or could you see it coming back into style?

DIY: Peel-and-Stick Backsplash

Well, I did it: I bit the bullet and tiled my lovely new, top-o'-the-line kitchen with stick-on subway tiles.

Before you have a chance to type "WTF" in the comments section, let me recap the thought process leading up to this ill-advised move. I've spent the last few months living in the state of Indecision, USA regarding our kitchen walls—the full story is here—and even though I've come around to wall tile, I can't commit to another pricey project, as all our funds are being pumped into the back patio and deck right now. But once I made up my mind to tile, I couldn't bear looking at the bare walls any longer. Every time I walked into the kitchen, they yelled at me: "We're naked! The only thing you'll let us wear is spaghetti sauce! Don't make us suffer through tomorrow's Chicken Tikka Masala!" And I wanted to really KNOW, not just imagine, what tile will make the space look like. 

Spoiler: It looks good. Really good.

Last Monday, I bought 6 packs of STICKTiles online and warned Dave. “Do you know what this weekend is?” I announced. “It’s PEEL AND STICK SUNDAY!”

Cue the side-eye. After killing our budget on a fancy range hood, commercial stove, and marble counters, I was going to put STICKERS all over the wall? Stickers that would likely peel off the paint job we had just paid for a few months ago?

Knowing I was not going to back down, and knowing the at the four-figure cost of real tile was the alternative, Dave took a step back. “Knock yourself out,” he sighed. If it looks great, we agreed, we’d leave it up until we’re ready for real tile. If it looked like ass, we’d just peel it off, sand and repaint, and cut our losses at a couple hundred bucks.

Walls before backsplash
Bare walls before.

Bare walls before.

I got to work clearing the counters, cleaned the walls of dust and grime, and gathered my supplies: A sheet of cardboard to use as a cutting surface, a sharp utility knife, a large, clear ruler, a pencil and some painter’s tape. I unscrewed and removed all of the outlet plates as well. 

My arsenal.

My arsenal.

Starting at the window casing nearest the sink, I penciled a faint guideline along the top edge to ensure the tiles would be level and placed the first piece on the wall. 

Faux tiles going up.

Faux tiles going up.

I worked my way toward the corner, overlapping the sheets of tile.

Applying the removable tile

Because it’s an offset subway pattern, there were naturally lots of gaps in the field at corners and along the bottom. Whenever I cut an extra tile or a piece off a sheet for a corner or outlet, I set the excess aside to use later when filling in gaps.

Glad I saved this little guy!

Glad I saved this little guy!

After the first few tiles were up, I started to worry about a slight lean to the “grout” lines, and the pattern becoming off level by the time I reached the stove. I began tacking subsequent sheets into place temporarily with bits of tape before I actually stuck them to the wall, ensuring the pattern would land in the right place once everything had been adhered.

Aligning the peel-and-stick tiles

I continued the process on the right side of the stove. As each length of wall was finished, things looked better and better. 

Tile backsplash in place

And that’s it! I have to say, aside from the slightly rubbery texture when you press hard on them, the fact that they lay flat instead of protruding at the wall, and the tiniest, nearly invisible lines where the tiles overlap, these things look extremely real. They finish the space and the shine adds some dimension. We’ll see how they hold up, especially since I disregarded the explicit instructions not to place tiles this close to the burners of my stove (#safety #meltingPVC #imminentdeath).  

Yup, that was Sunday dinner. "Mommy's busy, kids! Go play!"

Yup, that was Sunday dinner. "Mommy's busy, kids! Go play!"

Backsplask complete

For now, I'm happy. Next year, when we put in the real stuff. I might go larger format, like this:

Or square:

Source: Front + Main

Source: Front + Main

I also I might extend tile to cover the whole sink wall, even around the door and window, like so:

Credit: Design by SuzAnn Kletzien, Image via HouseBeautiful

Credit: Design by SuzAnn Kletzien, Image via HouseBeautiful

But that’s another idea I need to sell my husband on. Since I know he reads this blog, I’ll just leave these pics of gorgeous all-tiled kitchens right here. They’re SO GOOD.

Source: Better Homes and Gardens

Source: Better Homes and Gardens

What about everyone else? Have you ever tried temporary tiles? Would you?

Obsessed With… Kitchen Counter Benches

Given that the company I work for has a billion and one barstools to offer, you’d think that finding seating for my kitchen would be a breeze. I see gorgeous barstools and counter stools online every. Single. Day.

But no. I had to have the ONE freaking style that isn’t made anywhere but the CZECH REPUBLIC: the Thonet barstool, a design dating back to 1850, which is right around the same time my house was built. 

Lots of people make a version of the Thonet chair, in all types of materials and colors. You’ll find aluminum ones, backless ones, brightly colored ones, even updated, low-back versions produced by one of the longstanding, contracted factories for Thonet chairs, Fameg.  RH, Crate & Barrel, Ballard, Serena & Lily, and tons of others sell their own versions of these icons.

But for my kitchen, which we’re designing to have this vaguely brasserie-inspired feel, I wanted a counter-height one in a deep coffee stain, with a basic wood seat rather than caning or cushioned upholstery—essentially the chairs I sat on in every bar in Paris. Which brought me to DWR, that mecca of authentic-modern for haughty authentic-modern design lovers.  

A fascinating mini-history of Thonet chairs.

After waiting weeks for the Semiannual Sale—hell no, I’m not paying MSRP—I  ordered two. And I promptly found myself trapped in counter-stool purgatory, as my two lovely Thonet chairs are currently floating somewhere in the Atlantic en route from the Czech Republic to the good ol’ USA, with no estimated delivery date confirmed. [raises fist at Michael Thonet]

After several calls to DWR,  I naturally started searching for alternatives. At least it's something to do while I wait, right? And I stumbled upon the loveliest idea: Upholstered kitchen counter benches. 

Hey now. I could totally see one of these at my island, which is big enough for precisely 2.5 stools, and imagine myself perched on one with both of my kids (figuring each one counts for .75 people) for quick meals and homework sessions.  

Dave is less convinced. “Seems hard to get in and out of,” he mused when I showed him the pics. And while I haven’t yet decided whether to go this route and abandon my bentwood originals, I’m happy to admire the options. Here are some of my faves (I’m especially loving the indigo ikat-dot one.)

1. Marcello counter bench in Ellie Indigo, $724, Ballard Designs. 2. Thibaut barstool in Cambridge Lemongrass, $2,030, South of Market. 3. Mission slipcovered dual-seat counter bench, from $771, Layla Grace. 4. Omaha gray counter bench, Standard Fur…

1. Marcello counter bench in Ellie Indigo, $724, Ballard Designs. 2. Thibaut barstool in Cambridge Lemongrass, $2,030, South of Market. 3. Mission slipcovered dual-seat counter bench, from $771, Layla Grace. 4. Omaha gray counter bench, Standard Furniture for dealers. 5. Fitzgerald counter bench, from $1,395, Williams-Sonoma Home. 6. Andover upholstered kitchen bench, $290, Wayfair.

What do you think? Would you swap multiple bar or counter seats for a single upholstered piece?

Renovating with Kids: A Cautionary Tale

Friends and colleagues often ask how we’ve been living through our renovation, especially with two children under 5. In short, it’s not easy. It sometimes sucks quite a bit more than I let on. 

But over the last six years (I’m including a pregnancy here), I’ve arrived at a few truths—things I’ve learned the hard way, and that I’d like to share with anyone who’s considering doing the crazy and starting a project with little ones around. Here are 6 things everyone with kids should know before applying for that building permit.

1. Dust is your greatest enemy.

Every project creates dust—demolition, for sure, but also carpentry, painting and wall repairs, tiling, et cetera. And that dust will quickly get airborne, blown around, and tracked from space to space on the soles of your shoes. It’ll end up in rooms you’re not even working on. This is a guarantee.

Several years ago—I think it was when we demolished the basement—we went away for a long weekend to escape the chaos of construction. When we came back, I immediately noticed a thin layer of dust coating everything in the house, from the mantels and the stair rails to the third-floor furniture. A subcontractor had neglected to cover the air vents in the space where he was working, and the dust he produced was sucked into the ducts, blowing it across every square inch of the house.

Anyone who has toddlers knows that any unpalatable substance in your home, be it dirt, glitter, or pet hair, will inevitably end up on their hands, in their eyes, and in their mouths. And since we had no way of knowing what was in the dust (Paint? Lead? Plaster?) that had blanketed our belongings, we had no choice but to clean everything we owned. With the help of a cleaning crew and a few hundred microfiber rags, we washed and wiped everything not enclosed in a box or cabinet. Buckets of blocks, balls and plastic toys went into tubs of soapy water; every item and every surface had to be wiped with a damp rag. Every piece of furniture had to be vacuumed three times with a HEPA filter, every bed stripped, and all of our towels turbo-washed. I threw out our toothbrushes. It was the worst.

The lesson: Renovation projects become much less impactful once you learn how to manage the dust. We now use zip walls, these amazing inventions that let you seal off areas with plastic and enter and exit via a zipper system. We sometimes even build semi-permanent walls that divide the work zone from the living zone. We also triple-check to ensure the HVAC system is turned off in the work zones, and we cover and tape the vents so there’s no path for dust to travel. We place rugs or drop cloths at the entrance to the work zone, so dust won’t get tracked through the hallways. And we always keep plastic dropcloths around to keep dishes and toys dust-free.

2. You can never have enough rags.

See above. Microfiber towels, terrycloth rags, flour-sack towels, dish rags: You need them all. 

3. Insulation products look like snack food.

Ever see those huge rolls of Owens-Corning insulation in Home Depot? Yeah. Your kids will point at it and say “cotton candy,” and you will have to physically restrain them as they barrel toward the aisle with their mouths open. And when your son walks up to a recently framed-up windowsill and shouts “Pirate’s Booty,” know that he is about to pull a piece of spray foam out of the wall, and that you will intercept it two inches from his mouth.

On the left, spray insulation. On the right, delicious Booty. The confusion is understandable.

On the left, spray insulation. On the right, delicious Booty. The confusion is understandable.

Be vigilant, mamas. Which leads me to…

4. Contractors aren’t mothers.

Even the best, most considerate contractors on the planet can’t keep an under-construction home truly safe for kids. That’s your job. You can ask electricians and plumbers to pick up after themselves, and to use the Shop-Vac at the end of each work day, but it’s unreasonable to expect them to keep everything baby-proof while also doing everything they need to get your electrical, plumbing, and other systems working. So as long as there’s construction in your home, and probably for six months after each project, be aware that there may be rogue staples on the floor, nail heads peeking out of new carpentry, bits of copper wire in the carpet, outlet covers that were removed, and more. Scan a room for hazards before letting your kids play there unattended, and sweep and vacuum whenever you have the chance.

5. You need to plan for the process, not just the end result.

Assume your project is going to take longer and be far messier than you originally plan, and find ways to make your situation sustainable for longer than you’d like. That might mean creating a temporary cooking station in the living room, buying a portable dishwasher that hooks up to the bathroom sink, converting a living room to a bedroom, or hell, even getting kitting out your backyard with an outdoor shower. (I have done three out of these four things.) This is especially important with kids, who can’t just go without bathing for a few days, crash on a friend’s sofa, or go out to restaurants for every meal. 

When renovating our current kitchen, for instance, we found a friend willing to let us cook at her house for a week and a neighbor who’d let us use their grill, and Dave used that time to build a temporary kitchen in our mudroom downstairs. Here's a pic.

Our “crazy kitchen,” as the kids called it, made from the cheapest Home Depot cabinets and counters we could get, the old sink and faucet from our previous kitchen, a compact Craigslist fridge, and a $100 convection toaster oven. It occupies wh…

Our “crazy kitchen,” as the kids called it, made from the cheapest Home Depot cabinets and counters we could get, the old sink and faucet from our previous kitchen, a compact Craigslist fridge, and a $100 convection toaster oven. It occupies what will eventually become our mudroom on the garden level. My husband installed it in three days, because apparently men from Ohio just know how to do things like that.

Sometimes it's even more complicated. Two years ago, when we ran all-new heating, electric, and plumbing, added one bathroom, and renovated another, we knew that the project was going to be too invasive to live with. For three months that turned into nearly five, we rented a nearby apartment in a high-rise. Our toddler slept in a windowless "office," our mattress was on the floor, and I was 4 months pregnant. It was noisy, inconvenient, and far from lovely, but it made our situation sustainable so that we could get the work done right, and not cut corners because we got tired of huddling in a corner of our home.

It’s all about creating interim comfort, and it's always worth it. If all goes quickly and cleanly, you can take down the interim solution earlier, move back into your finished spaces, and pat yourself on the back. But if sh*t hits the box fan and your project plan gets extended by a month, you’ll be able to chug along just fine.

6. Kids like to be involved.

All of my advice thus far has sounded pretty grim, hasn’t it? But the truth is, renovations can be a whole lot of fun for kids. A few years back, I interviewed Dana over at the amazing blog House*Tweaking about her own renovation experiences, and she told me about handing her tots a sledgehammer on demolition day. Why not? 

During this last project, after we built a temporary wall between our in-progress kitchen and the rest of the house for dust reasons, we noted that our kids liked to yell their morning “hellos” to our GC, Jimmy, through the plywood. So Dave went to the hardware store, bought a piece of Plexiglass, and had Jimmy saw a hole in the door.

Watching the new walls go up in the kitchen. 

Watching the new walls go up in the kitchen. 

Through this “aquarium” window, our kids watched the entire progress of the redo, stopping by a few times a day to make piggy-noses on the window and oink at the carpenters. And when it was time to place the countertops, Jimmy took down the wall and called my daughter over to write her name on the cabinetry before they glued down the marble, preserving it for posterity.

She loved it—and so did we. At the end of the day, I want my kids to know this is their home as much as ours, and the project is for them, too.  I’ve never wanted a “do not touch” home—so I’ll let them draw, hammer, and watch. 

I just won’t let them taste the insulation. 

Renovation_with_kids_ideas

My husband's mistress.

Dave has a mistress. On Saturday morning around 10:30 a.m., I told him I knew exactly what was going on. Did he think I wouldn't notice how distracted he was? How he was making excuses to leave me with the kids so he could lavish her with attention?

I can't even compete. She's in my kitchen right now. She’s not going anywhere….

…because she weighs 650 pounds.

Meet Ina. She's sturdy, hardly shy, and looooves to make prime rib.

The Capital Culinarian 48-inch self-cleaning range. Ours has a third pair of burners in place of the grill.

The Capital Culinarian 48-inch self-cleaning range. Ours has a third pair of burners in place of the grill.

Ina is a Capital Culinarian, a pro-style range with 6 burners and a griddle. After years of mulling popular pro-style options like Wolf and Viking, followed by a few months exploring lesser-knowns like Dacor and Bluestar, we saw a Capital in person and knew it was right. We love cooking things that need to be seared, pan-fried, and slow-simmered, and we liked the flat grates and open burner (not sealed) system that evenly distributes the flame and gives us complete control over the heat.

For a while, a copper-hued range from the Bluestar Precious Metals Collection was my frontrunner. I loved the Bluestar’s open burners and badass style options, including the ability to customize knob color and door-swing orientation.

Copper love. 

Copper love. 

But after playing with a Bluestar in person at a local showroom, we quickly shifted gears. The metal construction felt thin and flimsy, and every custom option I wanted raised the price by a big notch.

Tinkering with the showroom model of the Capital, on the other hand, we kept discovering awesome feature after awesome feature. The grate and burner assemblies come completely apart, so if you're like me and tend to let pots boil over, you can take everything off and clean every last crevice underneath. There are easy-slide drip pans that catch big spills. There's convection on one of the two ovens, speeding up cooking time for big roasts and gratins, and the racks are on wheels and cantilevered, so you can easily slide your pan out to check doneness.

And then, after we were already smitten, we saw this button on the right:

Schwing.

Schwing.

It was like getting a new girlfriend and then finding out she has a lake house. With jet skis. Dave couldn't sign the credit card slip fast enough.

Now that she’s taken up residence in our home, it’s clear she’s more Dave’s sweetheart than mine. This is what I cooked the first day she was plugged in:

No backsplash yet.... Coming soon!

No backsplash yet.... Coming soon!

Later that night, Dave had a go. He made a Spanish-inspired fried chicken with smoked paprika and crispy panko crust. Seriously. I should have known something was up.

Then, on Saturday morning, he announced the following on Instagram:

Dawning of a new era. 

Dawning of a new era. 

And last night, I came home to this:

Food tastes better when it rotates. 

Food tastes better when it rotates. 

I guess Ina and I are going to have to be sister wives. Mondays he sleeps with me, Tuesdays with her, and so forth. As long as that rotisserie keeps cranking, she and I, well, we have an understanding. 

Anyone have any great rotisserie recipes? What should Ina tackle next? Let me know in the comments...